Tuesday, 17 November 2009

Fractional Fun

(Programs and Mandelbulb screensshots available at the end of the post!)

This blog post will not be totally game related, but more about the engine and a recent obsession of mine. Do not fear though! It should hopefully still be interested and I will also provide some nice images! Hopefully it will also be able to evoke a sense of wonder too. Read on to find out!

Ten years or so ago I wrote a paper for school about Fractals. These constitute a large variety of objects but what they all have in common is that they have several levels of self similarity. Nature consists of tons of fractals, for example trees and mountains. In games the term fractal landscape was quite common at time and was a way of generating terrain. Although not heard of as much today it is still a part of game making. Below are some examples of fractals, note how the same type of shape appears over and over again:
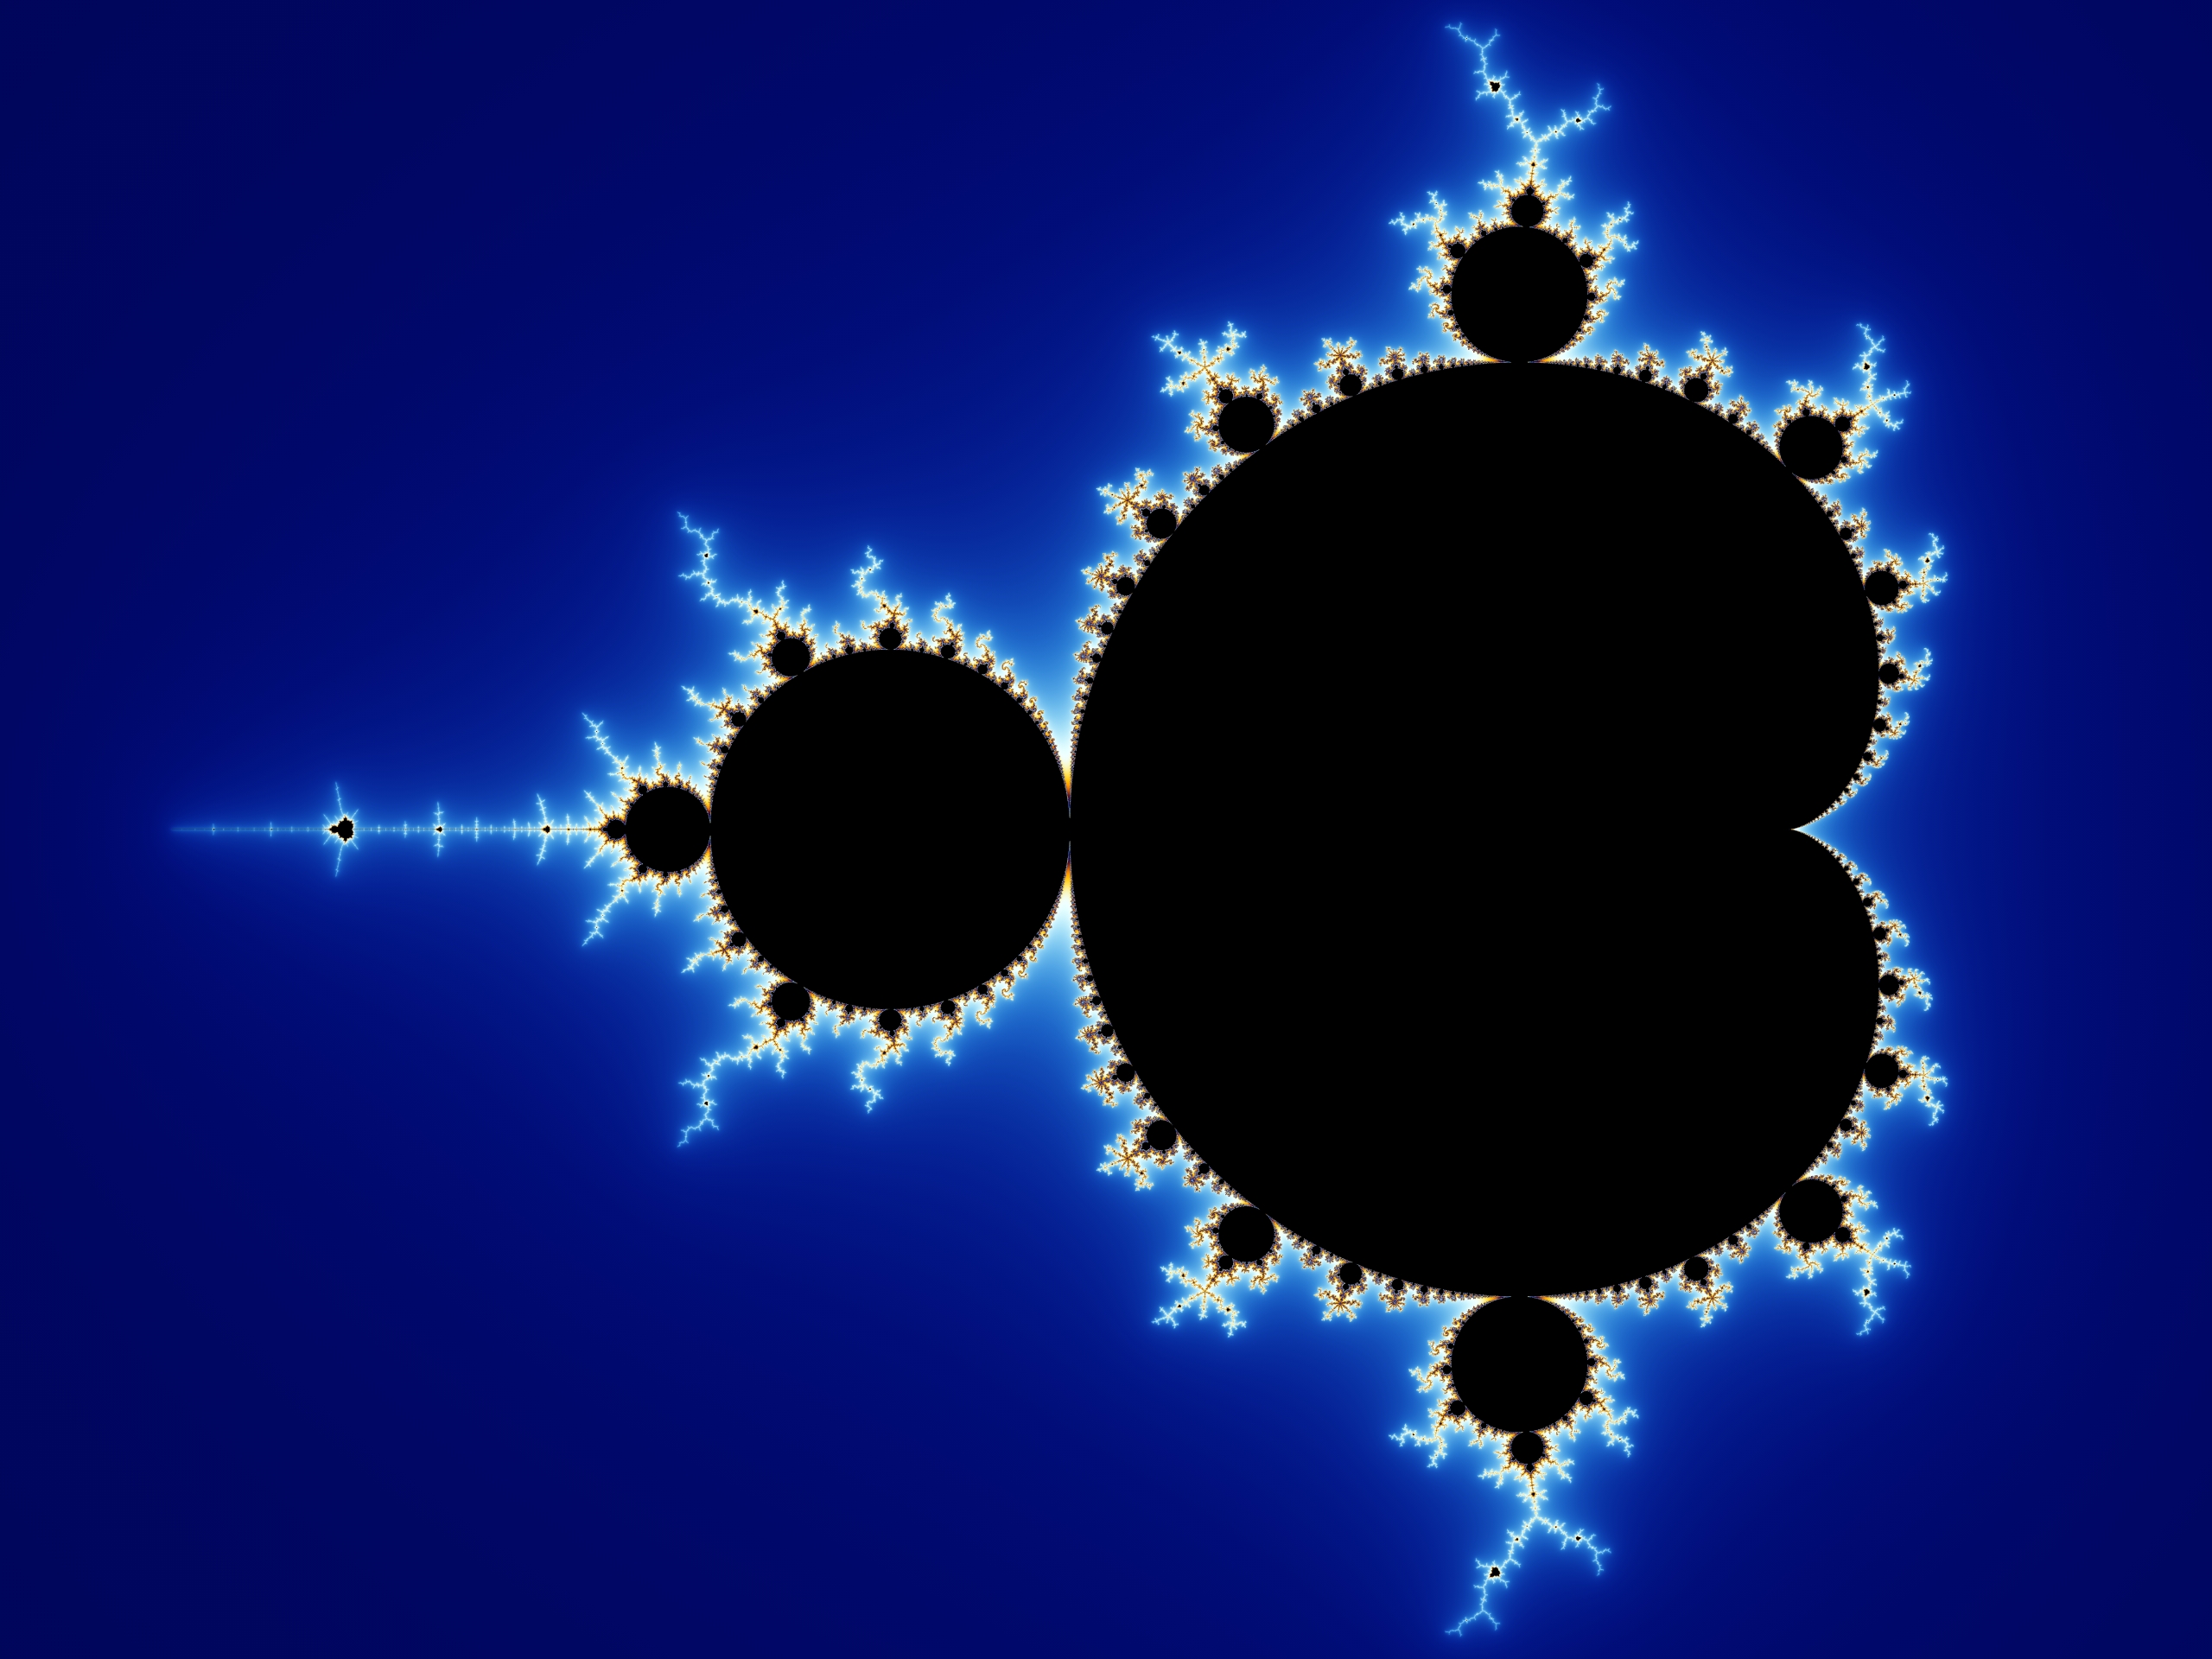
Now, while doing the paper for school I came across a weird thing called the Mandelbrot Set. This is a certain function that when iterated and mapped (drawn to screen) creates a fractal. The function for the set is very simple and is based around this formula:

N(0) = c
N(n+1) = N(n)^2 + c

What this means is that one starts of with a number c, then multiply by itself and finally add c to get the next number in the sequence. If done with normal numbers, one gets something like this:

1 + 2 + 5 + 26 + ... and so on towards infinity


However, there is a twist to this formula when creating the Mandelbrot set, instead of using a normal number for c, a complex number is used. A complex number has a real and imaginary part and is written like this: c = 3 + 2i (the imaginary parts gets i behind it). When using the above formula on a complex number, it gets slightly more complicated and is (kinda) analogous to a 2d vector being rotated by itself.
Now, to get the Mandelbrot set, one "simply" checks if a certain c makes N go toward infinity or not. If it it does not, then it is part of the set. In practice one just iterates (does the same thing over and over) the formula a fixed number of times and see if it has reached a certain limit value. If it has it is said to be not part of the set.

Hopefully the math part made sense and was not too boring, but I felt it was needed for full understanding of what makes the Mandelbrot set so amazing. And to see why it is amazing one has to visualize it. This is done by letting c be a point on the screen where the x coordinate is the real part of the y coordinate the imaginary. Then one colors the pixel black if it is part of the set, and if not color it depending on how many iterations it took to reach the limit value. Doing so will generate this picture:


I gotta say that that is a pretty damn detailed picture one gets from just iterating some boring function! If someone had just shown me the formula I would never have guess it could produce such a wonderful result!
It gets even better still! If one zooms in on this image, the details just keep coming and they never repeat! As with the other fractals same kind of shapes return again and again, but never in the exact form. The beauty of it is breathtaking! Here are some examples of zoomed in parts:

Large versions: here, here and here.


When I made my own Mandelbrot program I could not stop searching the set. It felt like I was exploring some kind of alien world and it feels so weird that such a simple formula can create a cosmos of infinite detail. If you want to explore it yourself, here is a pretty nice web application for just that.


Fast forward to present day. Last Friday Luis sent me a link to this page of someone who managed to create a 3d version of the Mandelbrot set. Naturally this was irresistible for me and inspired by the works of IƱigo Quilez (I had his presentation "Rendering World with Two Triangles" as a reference throughout this project) I set out to create a real time application that could explore this world .

My idea was to use some kind of ray tracer to render out depth, then use that depth to generate normals and just plug that into the deferred shader and let it add ssao, nice light and fog. I thought about this for a while and came up with the idea to use the same method as when rendering high quality parallax. This technique is called relief mapping and works by first making a rough linear search for an intersection and then a binary search to pin the exact location down. Hopefully this would prove fast enough to do a nice 3D Mandelbrot in real time! What I ended up with was an algorithm that could render arbitrary mathematical functions, so I tested this on some functions and got pretty nice results:


Some metaballs rendered and animated. This is not the fastest way to do this, but proved that stuff worked!


Here is an animated "Sine Landscape" that is just a bunch of sine curves added together.


What was left now was to attack the Mandelbrot set! The formula for getting hold of the 3D version is a little bit different from the 2D one and is not really THE 3D Mandelbrot either, but it surely the closest I have seen! It was discovered by Daniel White and works by using spherical coordinates. Remember how I said that the 2D Mandelbrot formula was kind of like rotating a vector by itself. Well, in the 3D version one rotates a 3D vector around itself by using spherical coordinates instead of polar (skipping formula, but if anyone is interested I can give more details!). Also, to make it look good in 3D, one has to have a power of 8 in the formula, meaning that one spins the coordinate around by itself 8 times!


It took quite some time get this working as the 3D-card did not do what I want to and so on. But finally I got it all working and boy was it worth it!!! Here are some screens:


At the edge of a hole. Perhaps some strange creatures live in those burrows?

This is a 3D version of a Julia set! Looks like some alien space ship flying through the vacuum.


Once I got this far I could not stop using it! It was so much fun exploring the weird world of the 8th degree Mandelbrot fractal! Because of some limitations in the ray tracing method I added a new version of the renderer that builds up the image in slices and can use a lot more iterations when checking if it is in the set or not (more iterations = more details). It is slower, but creates more details in the images and it is fun to use it when one discovers some extra interesting shape and want it enhanced. Here is a video of me exploring the set:


Now the best of all this is that YOU can explore this strange world yourself! To do so, just download the MathFuncRenderer and get going! (ShaderModel 3 capable card required) Windows, Mac and Linux version below.
Note that you need OpenAL installed for it to run. Get that here:
http://connect.creativelabs.com/openal/Downloads/Forms/AllItems.aspx

Winodws:
http://unbirthgame.com/MathFuncRenderer.zip
(Link might change so please do not hotlink)

Linux:
http://unbirthgame.com/MathFuncRenderer-Linux.zip
(Link might change so please do not hotlink)

Mac:
http://unbirthgame.com/MathFuncRenderer-Mac.zip
(Link might change so please do not hotlink)

(Also note that because of some nvidia driver issues in OSX, some nvidia card will not work properly, 7300 GT on leopard is known and there might be more.)


I am very anxious to see what kinda of strange pictures you all can take so have opened up a post for this in the forum. I have already posted more of my own images there.

http://www.frictionalgames.com/forum/thread-3044.html


Monday, 9 November 2009

The struggle between Light and Dark

When making a horror game an important ingredient is the darkness. When in a dark place people tend to be more easily spooked and have a more vivid imagination, a genetic heritage passed on from our ancestors who were hunted by predators at night. Taking advantage of this is important and just changing the light level of an environment can make a huge difference in the scare factor.

Of course one cannot just turn off the lights and hope to make a scary game. The player still need to be able to see something, as watching a pitch black image is not all that exciting. The appropriate amount of light also depends on the type of environment and the type of events that will take place. If the environment is very large, then it might need to be brighter, whereas smaller rooms, where it is easier to navigate, can be darker.

Added to this the player is usually equipped with some kind of lantern or flashlight to help illuminate. In Amnesia (and the penumbra tech demo) the player has a vague light around her to help make the closest surroundings more easy to see. Penumbra Overture and Black Plague had a large blue help light when sneaking in darkness, although this had the problem of illuminating too much. Finally another trick is to add "fog" that gets blacker the longer the distance and this gives a the darkness a more thick and oppressive feel. This was used to great effect in the first Silent Hill game and gave the added visual effect of enemies emerging from the darkness a head of you.

Once starting to implement this, a huge problem appear: Darkness is Subjective! This means that a certain area willseem to have a different light level depending on who plays it and how it is played.

The first problem comes from the monitor itself and depend on:

  • Light level of the room.
  • Settings on the monitor.
This means that depending on the current setup at a player, a scene can look vastly different. The only way to get around this is by some sort of setup screen. Ever since I made Fiend I have been obsessed by this and always make sure to do preparations when playing a horror game. The problem is that most games do not provide with any such screen and when they do the setting is often far from optimum and makes game way too bright. I cannot understand how game developers can miss something as important as this and wonder if they ever did any tests in a dark room when creating the adjustment screen (or even played the game using the purposed settings). It is even worse with movies and although I can not think of anyone who has raised this problem before, it can make a huge difference when watching a horror flick.

As implied above, I think it is essential to have a good light level setup screen for a game (and would like it for movies). For Penumbra we had an in-game gamma value that could be tweaked and also a test image to calibrate against. There were however two large flaws here. First of all the judgment required ("Make this screen barely visible") is a highly subjective! Instead we should have had some simpler and more accurate test and in Amnesia we will have two squares of different light levels, where one should be visible and the other not. This is far from perfect, but avoids some of the extra subjectivity. Secondly, gamma is not all there is to it: changing the contrast makes a large difference and can make the calibration image fail. There is also the actual brightness to be change which of course also make a large difference. To make matters worse these three values (gamma, contrast and brightness) affect each other too.

The problems does not stop there though! It also turns out that the apparent light level changes depending on the light environment it is in. This illusion clearly illustrates the point:

Although it is hard to believe, the squares A and B are of exactly the same light level! A game example of this is in Silent Hill were the background light level looks much darker when the flashlight is off than when it is on. This means that when you setup your monitor to look good when flashlight is on, it looks too bright when it is turned off. The game developers should actually have decreased the ambient light when the flashlight was off in order to give the best effect. Another example is how a game can look much darker when running in windowed mode because of a brightly colored desktop image (note: windowed mode usually do make a game objectivly darker, but this problem can add to the effect).

So how to solve this struggle between light and dark? For developers it is important to always check a settings screen and adjust gamma before testing the lighting in a level. And to do this properly there must off course be good tools for doing just that. Another important thing is to always try the light level of a map in different ways. How does it look when the flashlight is on, when it's off, what happens when the fog comes rolling in, etc. Changes in the environment and gameplay can greatly affect the perceived darkness which in turn can have great effect on the game's ambiance.

It is also upon the players to make sure that they set up properly before playing. I have read several reviews where the reviewer claimed that the game was too dark and one can wonder if they really had set up properly. One can also wonder if the makers of the game gave proper direction on how a good set up would be like! There needs to measures taken on both sides to assure that a game can reach its potential to frighten.

How do you go about with setting up monitor gamma and so on? How much thought have you given this in the past?


Thursday, 5 November 2009

The dull side of it - Part 1.

"Jens, I really need to read an email, but the email queue is taking forever to download! It's some guy named Brian that has sent a huge file as an attachment, probably 1MB. If not more!"

The other day I came to think of the above situation, when my dear father was in the need to read some email on the family computer back in 1997/1998. A few days earlier I had come in contact with a fellow named Brian Greenstone who was working on a freeware game and had asked on a game news site if anyone was interested in helping him. I volunteered to try and make some music. I was 18 and studying music during my final year of high school, with a life-long interest in games I thought this was a good opportunity to combine the two interest of mine. We discussed over email and he sent me the test builds of the game as simple attachments and I in turn sent my attempts at writing music back. My family had a 14.4 Kbps or maybe a 28.8 Kbps modem and sending and downloading those attachments took a little while... But that was how Brian worked with his game (and the following games too!), all content, as far as I know, was passed back and forth between the people working on the game using nothing but email.

As I thought about it I figured that maybe some interesting blog material could be found here. So, a couple of blog posts will take a look at how we have organized it here at Frictional and hopefully give a tip or two to those in a similar situation. To kick it all off I'm going to quickly go through how the company deals with daily communication among its members.

Frictional consist of five people, four live in Sweden, one in Spain and we do not have an office or place where we regular meet. We do all the work on our games from our homes and by using typical programs and technologies, all which are free. Much like other companies our work hours are from 8 in the morning to 5 in the evening and it is required that you are online on MSN during that period so that it is easy to get in touch with each other. While we also talk over the phone and through email, MSN is our main tool for daily communication. The exception is on Fridays when we meet up over Skype for our weekly meetings. The general idea is that news regarding the company (perhaps we have had a successful weekend sale) is shared to all the members and that all members do a quick "This I have done lately" presentation.

We split up our work in three week periods, where two weeks are the main period to work on a certain task and the third week is an extra week. The extra week is used to make sure there is time to compensate, should a task have had some problem or taken longer than two weeks. If anyone managed to finish within two weeks, the third week is used to work on some special assignment, usually something that is a bit more interesting and fun than the normal tasks. Should it be me, perhaps I spent two weeks making footstep sounds for 5 types of surfaces and on the third week I can instead work on making the sounds for a monster (which should be more interesting than walking on surfaces). On the Monday and the end of every three week period we have a "Show and tell" meeting on Skype where everyone has documented what they have done during the week and everyone can test it out (some gameplay, a new editor feature, new level etc). We spend 1-2 hours testing each others work, write down feedback and pass it to the creator, followed by the voice meeting where we give the most important feedback and discuss it.

That's pretty much it, only put on repeat! There is more work with the actual organisation and project planning, all the work that relates to who does what when and so on, but that would make this darn long. For next post I'll talk about the system we use for file sharing, we have used the same system since 2006 and have had some different solutions on where it has been hosted.


Monday, 2 November 2009

The Haunter Of The IGF

After lots of work and little sleep Frictional Games have entered into the IGF, an international competition for indie games, with our upcoming horror! The game is still a while from being completed, but the build we sent in to the competition is a very important milestone and the first version that gives of a taste of what the full game will be like. When creating a horror game gameplay needs to be tested over longer periods of time (because atomsphere, etc requires long build up) and testing the IGF version of the game tells us that we are on the right track!

At the start of the next year we will see if we managed to get nominated! In case you are wondering, Penumbra Overture entered the 2008 competetion (no nomination) and Black Plague did not enter in 2009 because we had financial backup from a publisher (i.e. not indie). Now that we are back as full indie we can enter again!

Now its back to work again!

Brain slugs sure are great motivators!
*Must... serve... hive*


Monday, 19 October 2009

Puzzles in horror games. Part 7.

Now it is time for the final part in these series on puzzles in horror games! This post will be about some puzzles in Penumbra that I personally find especially interesting. Because of this, the post will be filled with puzzle spoilers so if you are planning on playing any Penumbra game and have not yet done so, do so before reading!
First I am going to go through some basic guidelines we had when designing the puzzles though.

General puzzle design
Our main rule when implementing puzzles was something we called the "Island approach". What this means is that all things needed to solve a puzzle are located in the same area, the "island", and connections between islands should be very few and quite obvious. An example of this kind of connection was the hand and head needed to open the door the in residential area in Black Plague. The puzzles to get hold of the head and hand where both confined to their respective islands and where then linked together, hopefully obviously, at the biometric panel.

I think we managed to stick by this rule pretty well and it was just some instances, like at the end of Overture, when the connections became a bit too obscure. Considering the feedback we have gotten, the appraoch worked quite well and the island approach is something we will use for our upcoming game too.

Having gotten some critique after Overture that there where too many locked door puzzles, we set out to minimize the number of locked doors in Black Plague. Our main goal was to not have a single key-and-door puzzle and while we did not fully succeed, it did force us to come up with more interesting obstacle than we probably would have otherwise. Also, when having a locked door we tried to mask it as much possible or at least make it a bit more interesting by using other means of opening it. It was also interesting to see how many obstacles that boiled down to locked doors when one thought about and how hard it was to not include them.

Now for the puzzle examples:

Invisible Ink (Overture)
This started out as a puzzle where the player had to read a note written in invisible ink by using a uv-lamp and then our writer, Tom, suggested that the uv-lamp should also show text all over the walls. I really like how this combined the puzzle element with a strong horror event and from feedback we got it, people seemed to consider it one of the most frightening moments in Overture.

Exploding Potion (Overture)
At the end of of the game, the player needs to clear a cave-in by using homemade explosives. This is done by first mixing something called Armstrong's Mixture, a highly sensitive explosive, carry it through an "obstacle course" and place it at the cave-in. A fun fact is that we had to censor the real receipt for the mixture as we had to get a 16+ Pegi rating and our publisher where worried that learning kids how to make bombs would give it a higher rating. This is also the cause why dextrin was renamed to the nonexisting substance "baxtrin".

The puzzle was supposed to be solved by looking up the mixture in a book found earlier. However, it was made harder by not properly labling the chemical and a kind of cypher had to be solved. Because of some bad design in this, many people did not make the right connections and got stuck at it. Luckily, there where only 6 different chemicals and it was easy enough to solve it by brute force, something many seemed to do.

Trying to get the chemical past the obstacle course is a favorite of mine. I think many did not like it as it could be quite frustrating, but I think it did what it was intended to. It was quite tense and worked as a sort of physical endurance test as it could be quite exhausing to keep the mouse pressed down, knowing that releasing it for only a fraction of a second could make the solution explode.


The Blood Lock (Black Plague)
When designing Black Plauge another goal we had was to give the puzzles themselves a horror feeling. This puzzle does exactly that and connects quite nicely to the story giving the player some forshadwing of things to come. It is also an example of a locked-door obstacle that we tried to make more interesting and less generic. The desing of the device, where the player needs to inject blood in order to unlock a door, is not very realistic though and a silly way to lock a door in a facility overrun by alien creatures. Player's did not seem too bothered by this though and I think that as long something fits the game world and is fun enough, one can take a bit of implausibility.

The Cryogenics Chamber (Black Plague)
This is another puzzle where the element of horror was used as a base for design. To complete the puzzle the player had to nearly kill himself (making Clarence very disappointed) and then grab a severed head from a thawd cryogenics container. Hopefully this helped sending some chills down the player and still worked as a puzzle.

The Tuurngait Trials (Black Plague)
What made this series of puzzles different from any other puzzle in the Penumbra series was that it tried to convey an idea. The main goal of these puzzles was not to challange the player mentally but rather to have her think as a hivemind organsim and learn to see things their way. This was quite experimental and many people either did not get the theme (and just saw it as some puzzles) or thought that the whole section was out of place. A few people seemed to get the message though and this was very fun for us as we where worried nobody would like it. The segment was far from a success, but was at least a fun experiment and given that some people got the point it might be worthwhile to try the approach some other time (if we do, it will be in a totally different way though...).

Camera Puzzle (Requiem)
This puzzle starts the second leve andl is worth mentioning as it is probably the puzzle with the most possible solutions. The player can choose to take a different path at the beginning and if she decides to tackle the camera head on there are at plenty of ways to do so. Jens spent a lot of time with the puzzle and I was not aware of some of the solutions until after Requiem was released. This puzzle also shows that physics does not mean that puzzles have mulitple solutions "built in", instead it requires time and hard work to implement them. We put more and more time into this for each release and Requiem contains more multiple solution puzzles than the other two games combined.

That marks the end of this post and the horror puzzles series. Hope you all enjoyed it and at least gotten something out of it! As always please tells us what you thought about it and what you would like to see in the future.

For those of you who have not checked all parts. Here is a quick round up:
Part 1: Why are puzzles so suited for horror games?
Part 2: Common problems with adventure game puzzles.
Part 3: Why physics puzzles is not the "promised land" of adventure games.
Part 4: Backtracking and why it is essential.
Part 5: Things to consider when desinging puzzles.
Part6: On "brain boosters" and hint systems.


Tuesday, 13 October 2009

Time for a smallish update

Hi there again!

This time I won't show a new tool, but a new feature for our good old Level Editor: Decals. These are used mainly to add nice details to the level without much sweat. Here is a little video demonstrating how these can be used (to create a nasty mess for example :) )


Nice to know I'm not cleaning that

As you can see, there is some stuff to be tweaked and optimized, but I tell you it's still cool to use :D